How to Show Alert Messages in an iOS App (Swift)
In this guide, we'll show how to display alert messages like the ones below in an iOS app using Swift.
Prepare a Test iOS App that Shows an Alert
First, let's create a simple iOS app to display alert messages for testing.
In Xcode, create a new project using [iOS] → [App].
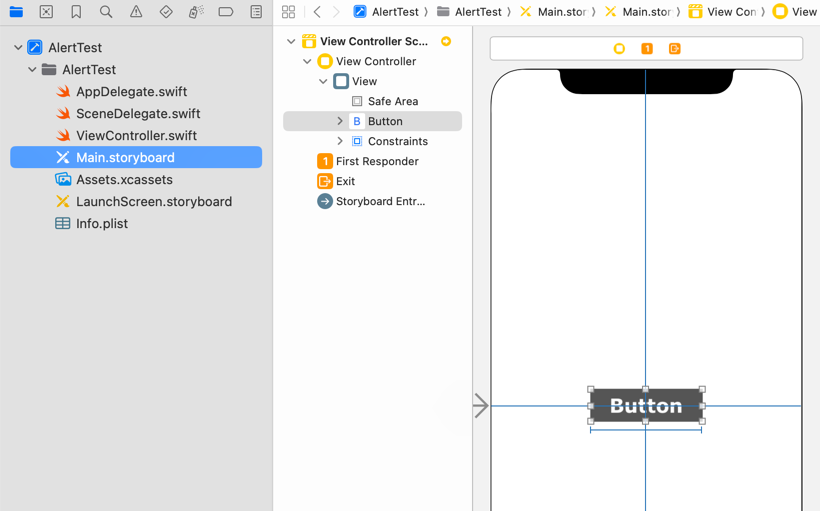
Place a single Button on the View Controller in Main.storyboard. The design and placement can be anything you like.
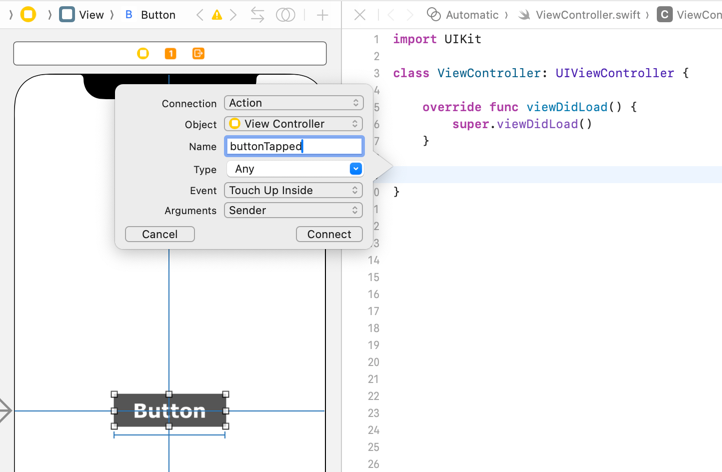
Create a Touch Up Inside action from the button named buttonTapped.
import UIKit

class ViewController: UIViewController {

    override func viewDidLoad() {
        super.viewDidLoad()
    }

    @IBAction func buttonTapped(_ sender: Any) {
    }
}
If you're unsure how to add a button or create an action, see How to Create a Basic iOS App.
Show an Alert with a Single Button
Let's start by displaying a simple alert with one button.
Update buttonTapped() in ViewController.swift as follows:
@IBAction func buttonTapped(_ sender: Any) {
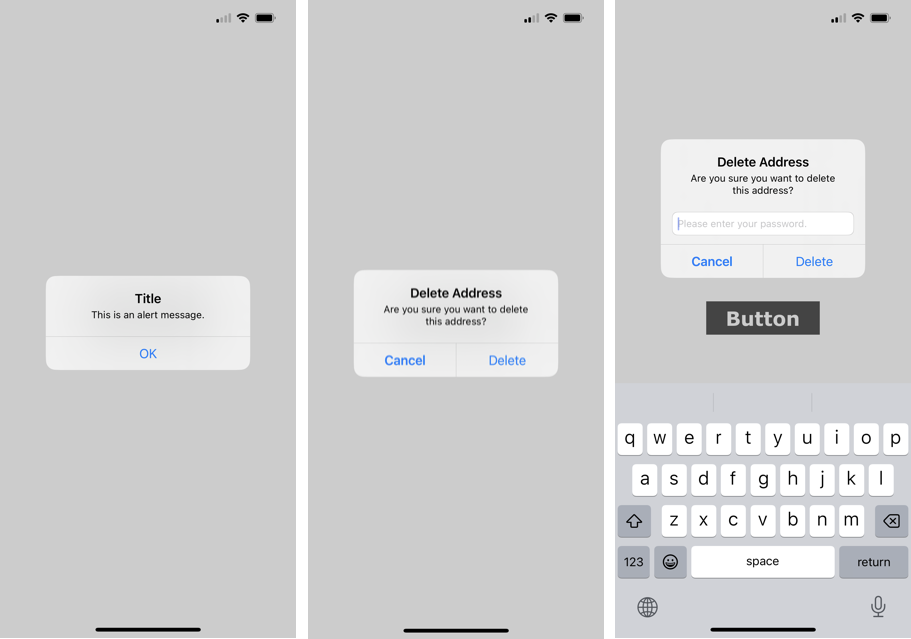
let alert = UIAlertController(title: "Title", message: "This is an alert message.", preferredStyle: .alert)
alert.addAction(UIAlertAction(title: "OK", style: .default))
self.present(alert, animated: true, completion: nil)
}On line 2, we create a UIAlertController with a title and message.
On line 3, we create an UIAlertAction for the OK button and add it to the alert via addAction().
On line 4, we present the alert dialog on screen.
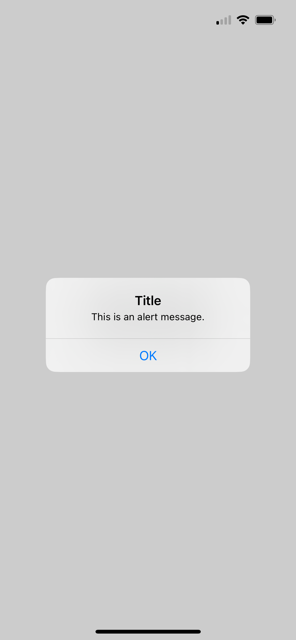
When you run the app, you'll see an alert like the one below. Tapping OK dismisses the dialog.
Show an Alert with Two Buttons
Next, let's show an alert with two buttons.
This is useful for confirmation dialogs where you want to run different code depending on which button the user taps.
Update buttonTapped() in ViewController.swift as follows:
@IBAction func buttonTapped(_ sender: Any) {
    let alert = UIAlertController(title: "Delete Address", message: "Are you sure you want to delete this address?", preferredStyle: .alert)

    let delete = UIAlertAction(title: "Delete", style: .default, handler: { (action) -> Void in
        print("Delete button tapped")
    })

    let cancel = UIAlertAction(title: "Cancel", style: .cancel, handler: { (action) -> Void in
        print("Cancel button tapped")
    })

    alert.addAction(delete)
    alert.addAction(cancel)

    self.present(alert, animated: true, completion: nil)
}
Line 2 is the same as before—we create a UIAlertController with a title and message.
Lines 4–6 create a Delete action via UIAlertAction, and the handler specifies the code to run when the delete button is tapped.
Lines 8–10 create a Cancel action and specify the code to run when the cancel button is tapped.
Lines 12–13 add both actions to the UIAlertController.
Line 15 presents the alert dialog.
When you run the app, you'll see an alert like this:
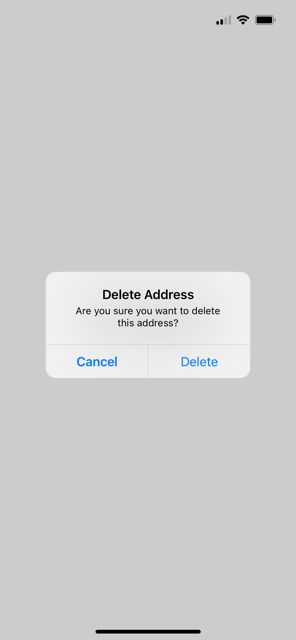
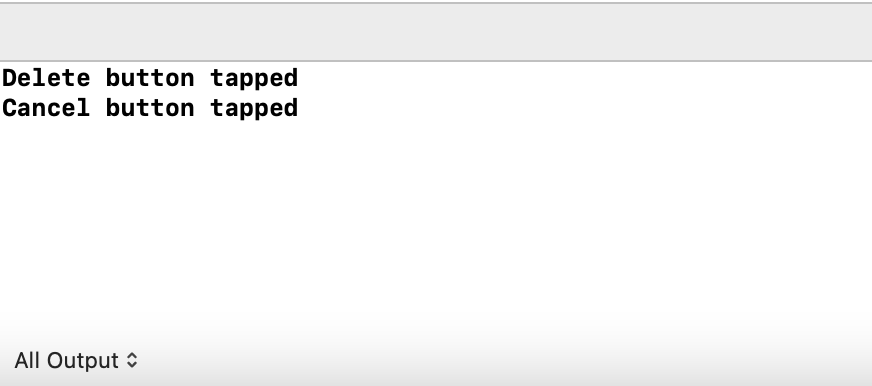
If you tap Delete, the console prints Delete button tapped. If you tap Cancel, it prints Cancel button tapped in Xcode's debug console.
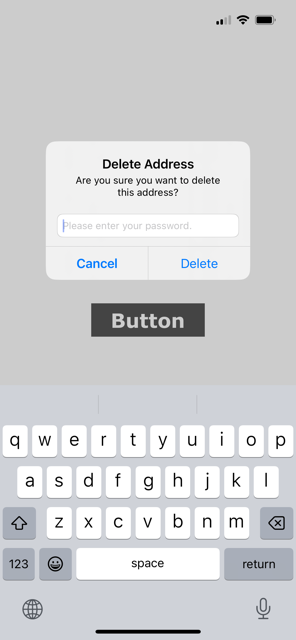
Show an Alert with a Text Field
Now let's display an alert that contains two buttons and a text field.
This is handy when you want to prompt the user to enter something while showing a message.
Update buttonTapped() in ViewController.swift as follows:
@IBAction func buttonTapped(_ sender: Any) {
    let alert = UIAlertController(title: "Delete Address", message: "Are you sure you want to delete this address?", preferredStyle: .alert)

    alert.addTextField(configurationHandler: { textField in
        textField.placeholder = "Please enter your password."
    })

    let delete = UIAlertAction(title: "Delete", style: .default, handler: { (action) -> Void in
        print("Delete button tapped")

        if let password = alert.textFields?.first?.text {
            print("Password: \(password)")
        }
    })

    let cancel = UIAlertAction(title: "Cancel", style: .cancel, handler: { (action) -> Void in
        print("Cancel button tapped")
    })

    alert.addAction(delete);
    alert.addAction(cancel);

    self.present(alert, animated: true, completion: nil)
}
Line 2 is the same as before—create a UIAlertController with title and message.
Lines 4–6 add a UITextField to the alert via addTextField() and set a placeholder.
Lines 8–14 create the Delete action and specify the code to run when it's tapped.
You can access the UITextField added to the UIAlertController via alert.textFields. Since we added only one, we get it with first and read its text (you could also use alert.textFields?[0].text).
Lines 16–18 create the Cancel action and specify its handler.
Lines 20–21 add both actions to the UIAlertController.
Line 23 presents the alert dialog.
When you run the app, you'll see an alert like the one below:
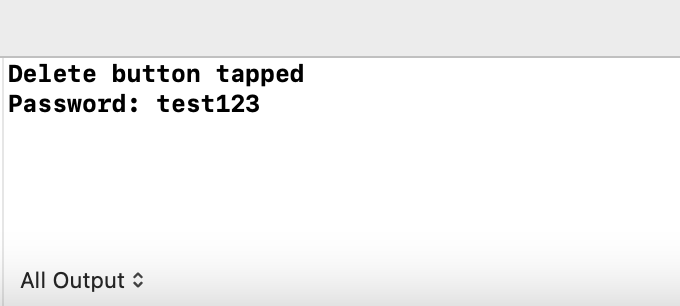
If you enter test123 in the text field and tap Delete, the debug console shows the following:
That's it! You've learned how to display alert messages in an iOS app using Swift.