How to Use Table View in Swift
In this article, we will explain how to use Table View, one of the most commonly used components in iOS app development.
If you are not familiar with each step in detail, please refer to How to Create a Basic iOS App.
What is a Table View?
Table View is an essential view in iOS development, widely used in apps such as the iPhone's Settings screen.

A table displays multiple rows (cells) that can be vertically scrolled.
It is often used in hierarchical structures, where selecting a row navigates to a detailed screen.
Difference Between Table View and Table View Controller
To use a Table View, you can either add a Table View to a View Controller or use a Table View Controller, which already has a Table View built in.
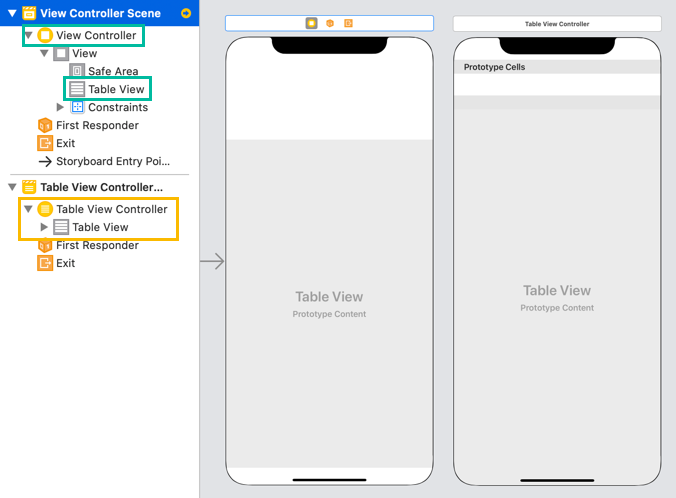
The Table View Controller already conforms to required protocols and implements the necessary methods for you.
However, you cannot move the Table View's position freely or place other objects around it.
Therefore, many iOS developers use a combination of View Controller + Table View.
In this page, we will explain how to use a Table View + View Controller.
How to Use a Table View
Let's create an app that displays data using a Table View.
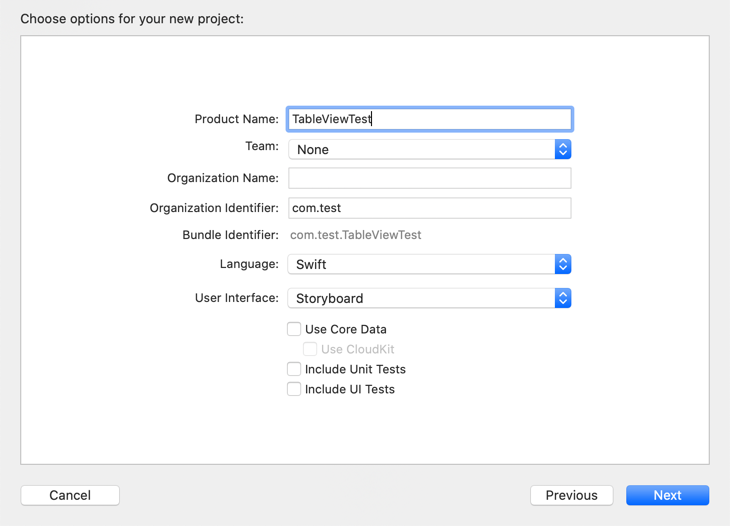
First, open Xcode, choose [App] from Create a new Xcode project, set Language to Swift, and select Storyboard for User Interface.
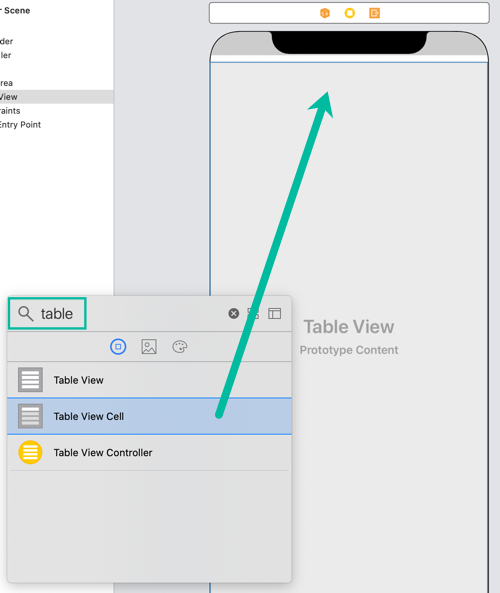
Place a Table View
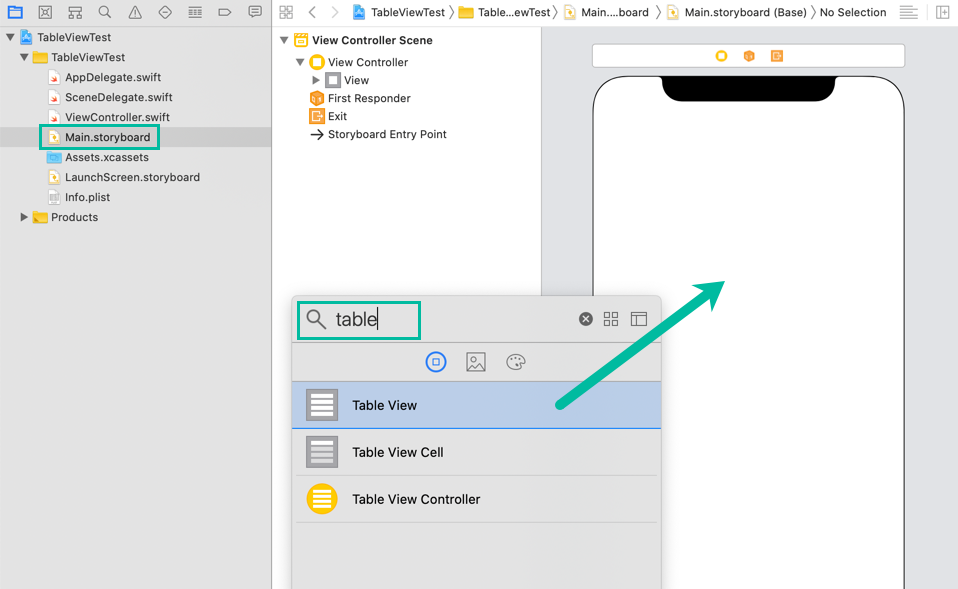
In the Project Navigator, select Main.storyboard.
From the menu, select [View] > [Show Library] (or shortcut key ⇧ Shift + ⌘ command + L) to open the Object Library. Then, find the Table View and drag & drop it onto the View Controller.
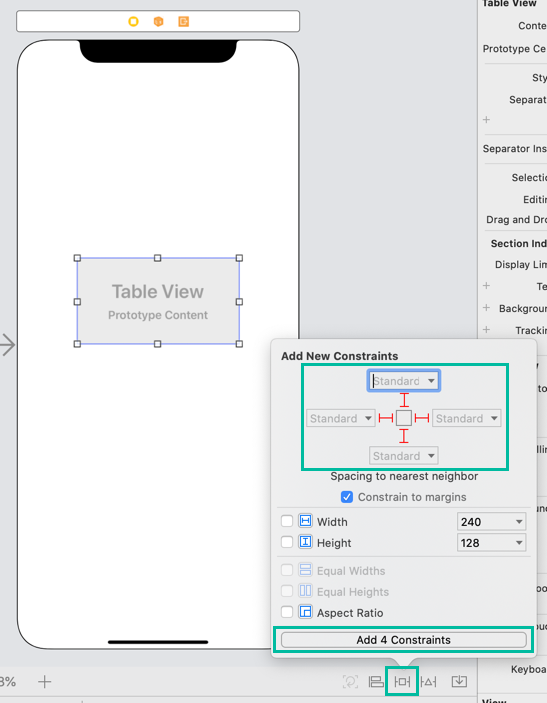
Then add constraints. With the Table View selected, click the [Add New Constraints] button at the bottom right of the editor.
Enter 0 for Top, Bottom, Left, and Right, and click [Add Constraints].
Depending on your version of Xcode, it may automatically display “Standard,” but you can add the constraints as is.
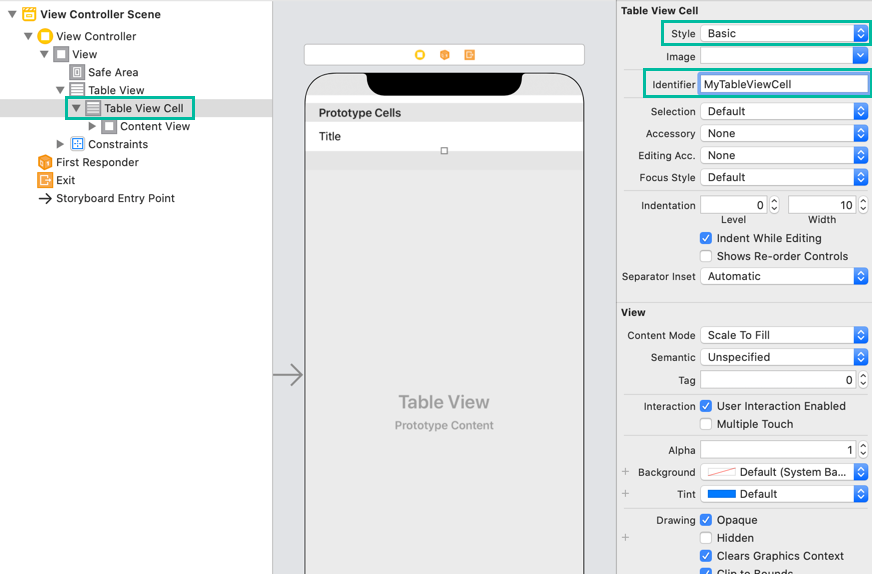
Place a Table View Cell
Next, place a Table View Cell.
Open the Object Library, find Table View Cell, and drag it onto the Table View.
With the Table View Cell selected, set its Style to Basic and Identifier to MyTableViewCell.
We'll explain Style and Identifier later.
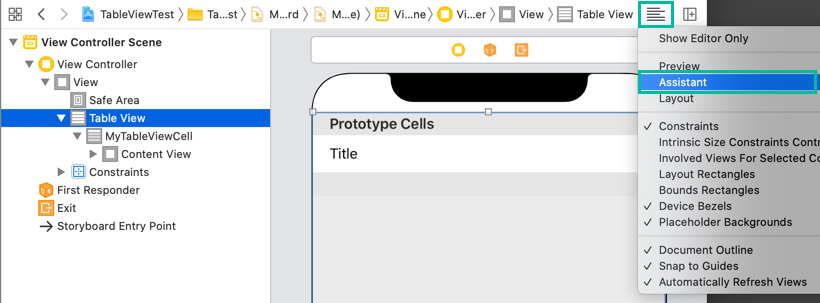
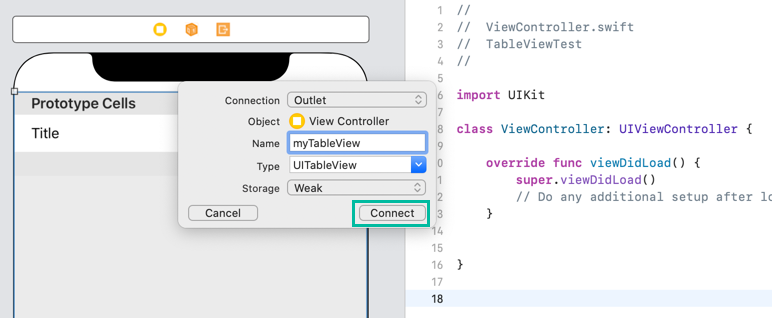
Generate an Outlet for the Table View
Next, generate an outlet for the Table View.
With the Table View selected in the storyboard, open the Assistant Editor via Editor > Assistant Editor.
You can also open it using the Adjust Editor Options button → Assistant.
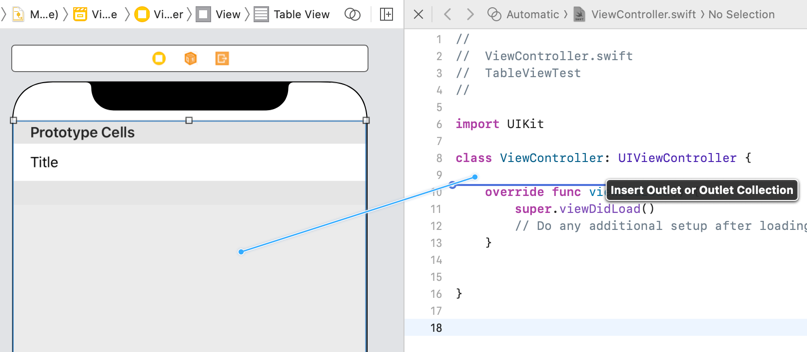
Once the Assistant Editor opens, confirm that the file displayed is ViewController.swift.
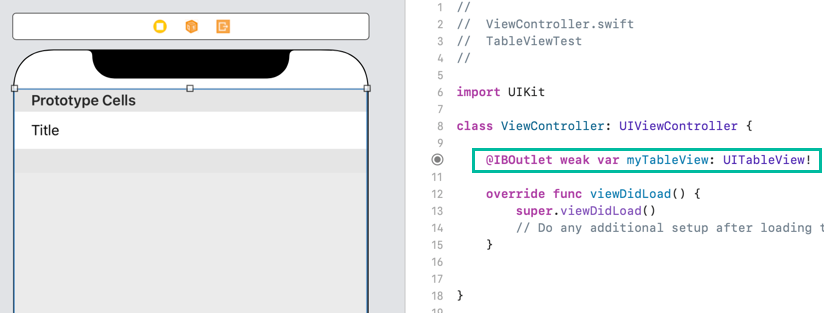
Hold the ⌃ Control key, drag the Table View into the ViewController.swift file under the class declaration, and create an outlet named myTableView.
Implement the Required Methods
Next, implement the required methods for the Table View.
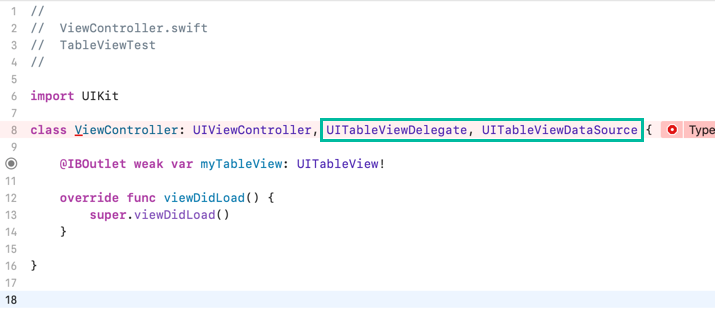
To use a Table View, you must set its dataSource and delegate.
In the Project Navigator, open ViewController.swift.
After UIViewController, add the UITableViewDelegate and UITableViewDataSource protocols.
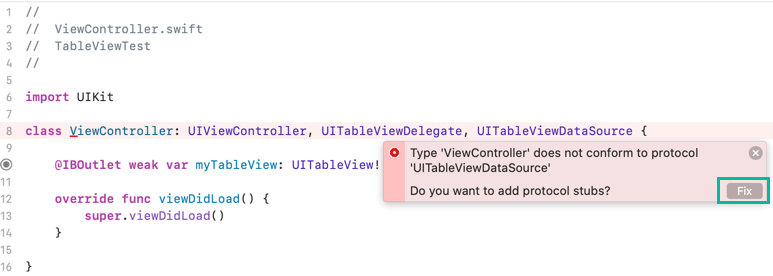
You must implement tableView(_:numberOfRowsInSection:) and tableView(_:cellForRowAt:). Xcode can auto-generate stubs for you using the Fix suggestion.
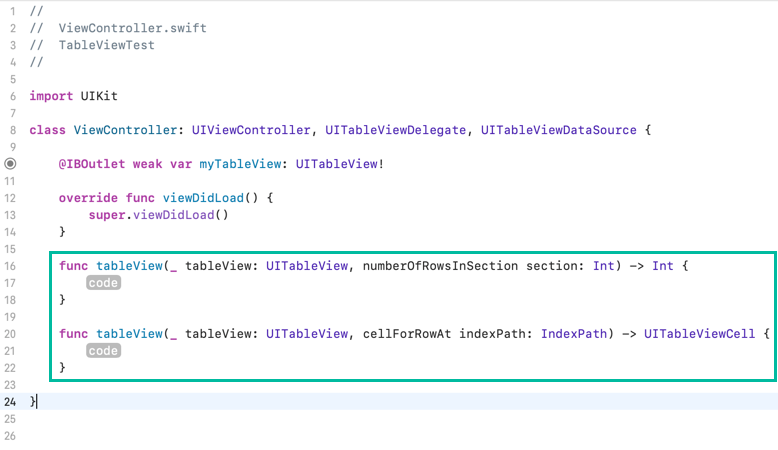
The stubs are inserted at the top, but you can move them below for clarity.
In viewDidLoad(), set the Table View's dataSource and delegate to self:
myTableView.dataSource = self
myTableView.delegate = self
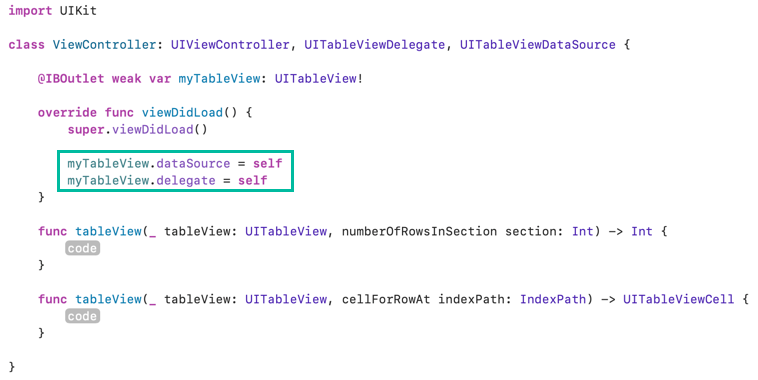
Now the Table View is ready to use.
Display Data in the Table View
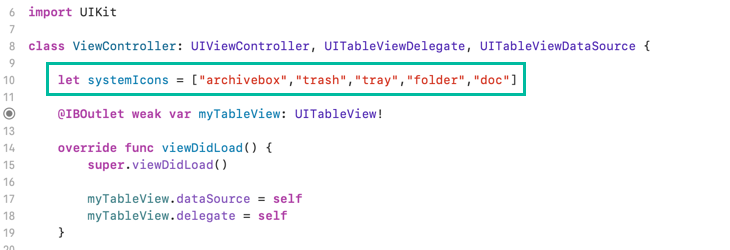
For this example, we'll use an array instead of creating a class for the data.
let systemIcons = ["archivebox","trash","tray","folder","doc"]
You can use any valid system icon names.
Define systemIcons near the top of the ViewController class.
Then implement the required methods.
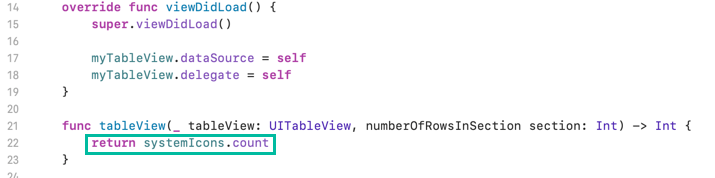
tableView(_:numberOfRowsInSection:) returns the number of rows in a section. Since we only have one section, return the number of items in systemIcons.
func tableView(_ tableView: UITableView, numberOfRowsInSection section: Int) -> Int {
    return systemIcons.count
}
tableView(_:cellForRowAt:) returns the UITableViewCell for a given indexPath.
Add the following code inside it:
func tableView(_ tableView: UITableView, cellForRowAt indexPath: IndexPath) -> UITableViewCell {
    let cell = myTableView.dequeueReusableCell(withIdentifier: "MyTableViewCell", for: indexPath)

    cell.textLabel?.text = systemIcons[indexPath.row]
    cell.imageView?.image = UIImage(systemName: systemIcons[indexPath.row])

    return cell
}
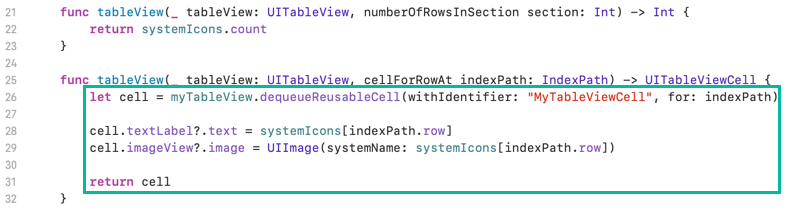
In the first line, we use dequeueReusableCell(withIdentifier:for:) to obtain a UITableViewCell object from myTableView, using the identifier "MyTableViewCell" that we previously assigned to the Table View Cell.
By using dequeueReusableCell, instead of creating a brand-new UITableViewCell object every time, it will reuse an existing UITableViewCell object whenever possible.
In the next line, we assign the element at indexPath.row in the systemIcons array to the textLabel property of cell.
In the following line, we generate a UIImage by specifying the element at indexPath.row in the systemIcons array as the systemName, and then assign it to the imageView property.
Finally, with return cell, we return that cell.
With this, we have finished writing the code to display data in the Table View.
For reference, here is the complete code of ViewController.swift.
import UIKit

class ViewController: UIViewController, UITableViewDelegate, UITableViewDataSource {

    let systemIcons = ["archivebox","trash","tray","folder","doc"]

    @IBOutlet weak var myTableView: UITableView!

    override func viewDidLoad() {
        super.viewDidLoad()

        myTableView.dataSource = self
        myTableView.delegate = self
    }

    func tableView(_ tableView: UITableView, numberOfRowsInSection section: Int) -> Int {
        return systemIcons.count
    }

    func tableView(_ tableView: UITableView, cellForRowAt indexPath: IndexPath) -> UITableViewCell {
        let cell = myTableView.dequeueReusableCell(withIdentifier: "MyTableViewCell", for: indexPath)

        cell.textLabel?.text = systemIcons[indexPath.row]
        cell.imageView?.image = UIImage(systemName: systemIcons[indexPath.row])

        return cell
    }

}
Build and Run in the Simulator
Now let's build and run the app.
Click the button on the left side of the toolbar to launch the simulator, install the app, and run it.

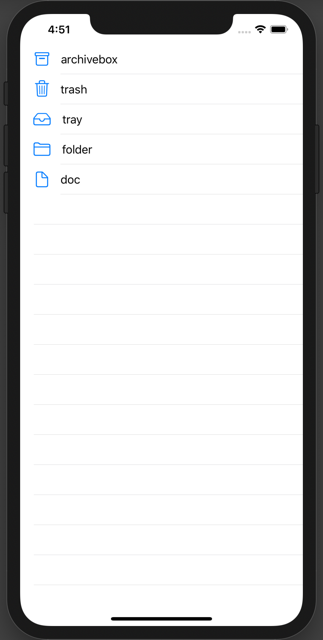
The system icons and their names in the systemIcons array are displayed in order inside the Table View.
About Table View Cell Styles
Finally, Table View Cells can be customized, but by default they include the properties textLabel, detailTextLabel, and imageView.
Table View Cell styles include Basic (used here), Right Detail, Left Detail, and Subtitle.
Here are examples of how textLabel, detailTextLabel, and imageView are displayed when values are set in tableView(_:cellForRowAt:):
cell.textLabel?.text = "Text Label"
cell.detailTextLabel?.text = "Detail Text Label"
cell.imageView?.image = UIImage(systemName: "archivebox")
Basic:
Right Detail:
Left Detail:
Subtitle:
That's all for the basics of using Table View.