How to Use Progress Bars (UIProgressView) in iOS Apps (Swift)
Sometimes you may want to display a progress bar when performing a time-consuming task.
In this article, we will explain how to use a progress bar (UIProgressView) in an iOS app with Swift.
Preparing an iOS app to use a progress bar
First, let's create a simple iOS app to test the use of a progress bar.
If you don't know how to create a new app, add buttons, or create actions, please refer to How to Create a Basic iOS App.
In Xcode, create a new project under [iOS] > [App].
For testing purposes, add a Button (Start), a Progress View, and a Label (0 %) to the Main storyboard's View Controller.
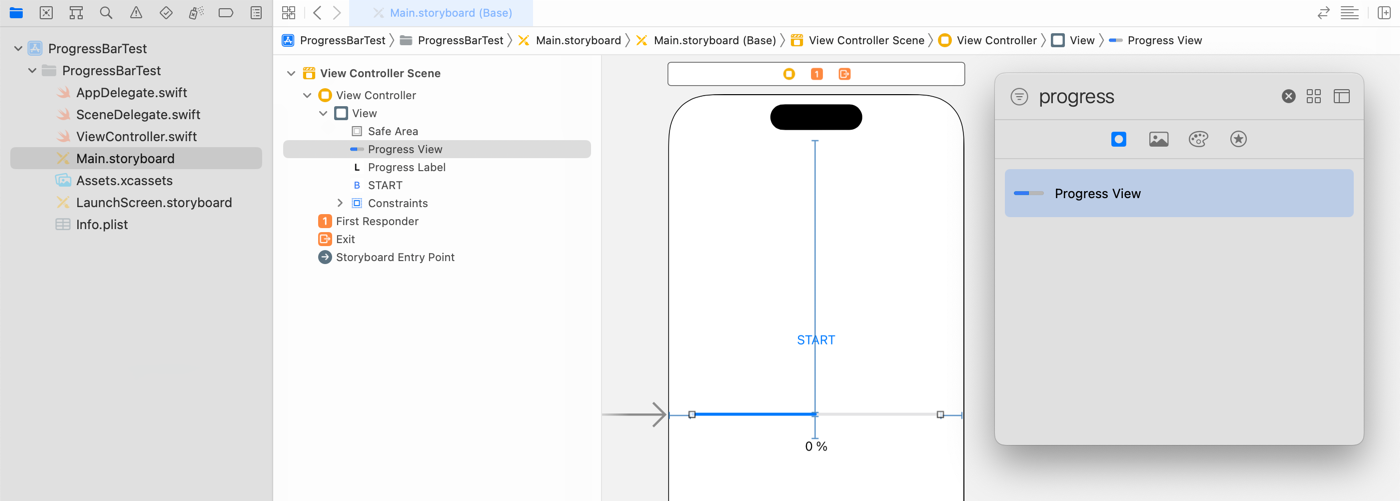
Create outlets named progressView from the UIProgressView and progressLabel from the UILabel.

import UIKit
class ViewController: UIViewController {
@IBOutlet weak var progressView: UIProgressView!
@IBOutlet weak var progressLabel: UILabel!
override func viewDidLoad() {
}
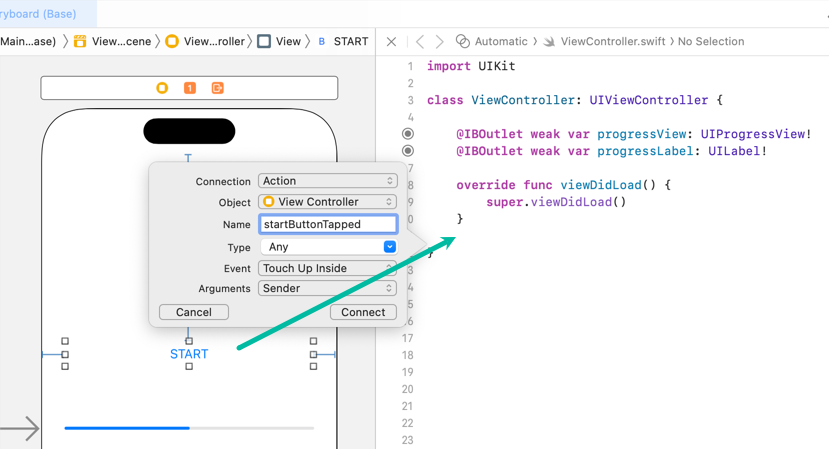
}Create an action named startButtonTapped for the Start button with the touchUpInside event.
import UIKit

class ViewController: UIViewController {

    @IBOutlet weak var progressView: UIProgressView!
    @IBOutlet weak var progressLabel: UILabel!

    override func viewDidLoad() {
        super.viewDidLoad()
    }

    @IBAction func startButtonTapped(_ sender: Any) {
    }
}
How to use a progress bar (UIProgressView) in Swift
Now let's write the Swift code to use a progress bar (UIProgressView).
When the Start button is tapped, the progress bar will start at 0% and update until it reaches 100%.
Update ViewController.swift as follows:
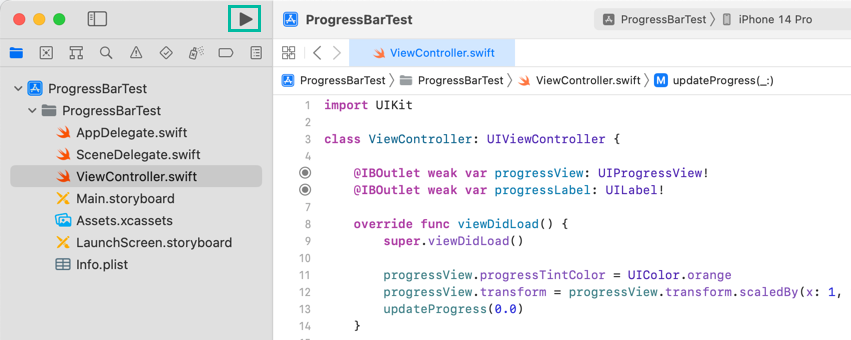
import UIKit

class ViewController: UIViewController {

    @IBOutlet weak var progressView: UIProgressView!
    @IBOutlet weak var progressLabel: UILabel!

    override func viewDidLoad() {
        super.viewDidLoad()

        progressView.progressTintColor = UIColor.orange
        progressView.transform = progressView.transform.scaledBy(x: 1, y: 3)
        updateProgress(0.0)
    }

    func updateProgress(_ progress: Float) {
        progressView.progress = progress
        progressView.setProgress(progress, animated: true)
        progressLabel.text = "\(String(format: "%.0f",progress * 100)) %"
    }

    @IBAction func startButtonTapped(_ sender: Any) {
        var progress: Float = 0.0
        updateProgress(progress)

        DispatchQueue.global().async {
            for _ in 1...50 {
                usleep(50000)
                progress += 0.02
                DispatchQueue.main.async {
                    self.updateProgress(progress)
                }
            }
        }
    }
}
Here's a step-by-step explanation of the code:
In viewDidLoad(), line 11 sets the progress bar color to orange using progressView.progressTintColor = UIColor.orange.
Line 12 scales the height of the progress bar by 3 times with progressView.transform = progressView.transform.scaledBy(x: 1, y: 3).
Line 13 initializes the progress bar by calling updateProgress(0.0).
The updateProgress() function takes a Float value as an argument.
Line 17 assigns the value to progressView.progress.
Line 18 updates the progress with animation using progressView.setProgress(progress, animated: true).
Line 19 updates the label to display the progress percentage with progressLabel.text.
Although setProgress() alone should update the progress value, at the time of writing there is a bug where the progress bar may reset in certain cases. To avoid this, we also update progressView.progress directly (line 17).
If you're curious, try removing line 17. Run the app, tap Start to reach 100%, then tap Start again — you may notice the issue.
In startButtonTapped(), we simulate a time-consuming process with delays.
Line 23 defines a Float variable progress and initializes it to 0.0.
Line 24 resets the progress bar and label to 0.0.
To simulate progress, we loop with delays, increasing the progress gradually. Since updating the UI directly on the main thread would freeze the interface, we use DispatchQueue.global().async to perform the loop in a background thread.
The loop runs 50 times, sleeping for 0.05 seconds each iteration and incrementing progress by 0.02.
These numbers are arbitrary — the key point is to increment progress from 0.0 to 1.0.
usleep() pauses the current thread for the given number of microseconds.
Lines 30–32 pass the updated progress value to updateProgress() on the main thread using DispatchQueue.main.async.
This completes the Swift code for using a progress bar (UIProgressView).
Testing the iOS app on the Simulator
Now let's build and run the iOS app we just created.
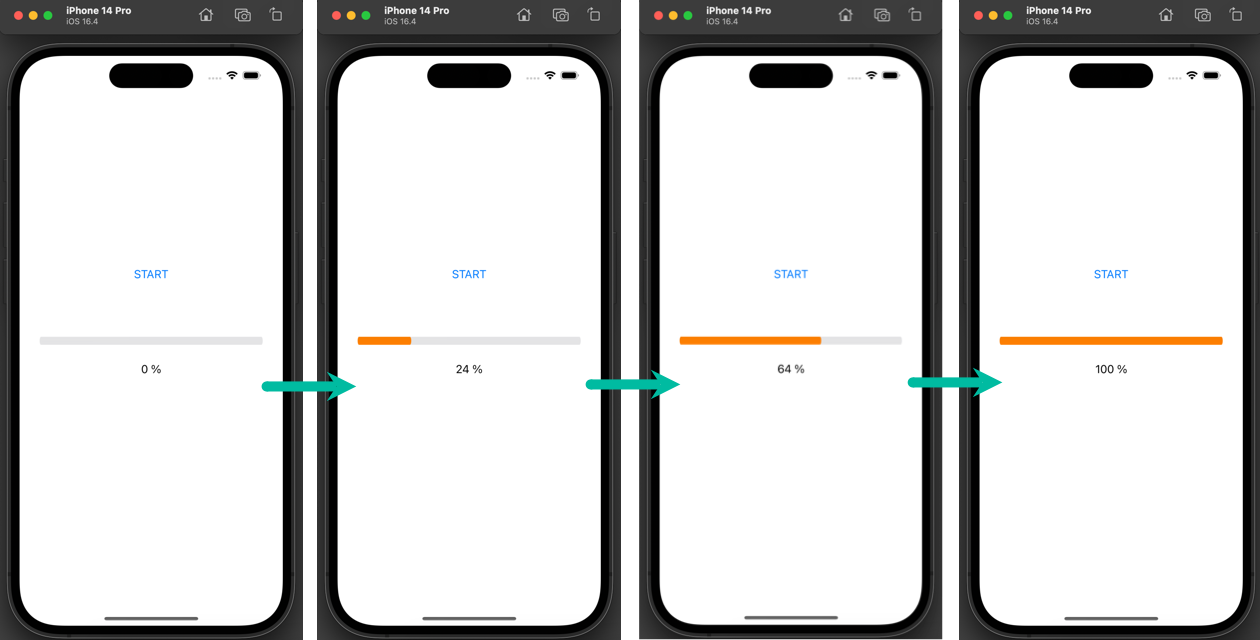
Click the button in the Xcode toolbar. The selected simulator will launch, install the app, and run it.
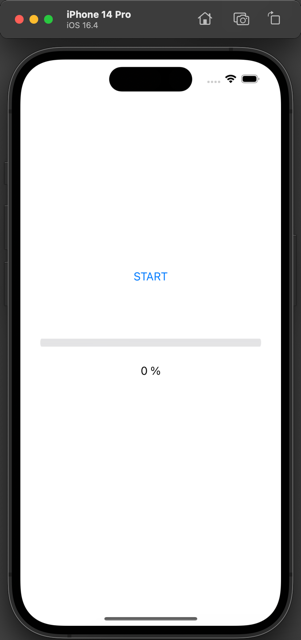
When you tap the Start button, the progress bar and percentage label will update until reaching 100%.

That's it! We have explained how to use a progress bar (UIProgressView) in an iOS app with Swift.