How to Build an iOS App that Receives Push Notifications
In this article, we will explain how to build an iOS app that receives Push Notifications.
Enable the Push Notifications Capability in Xcode
First, add the Push Notifications capability to your project.
Open the project in Xcode where you set the Bundle Identifier in How to Create an App ID for Push Notifications.
In the Navigator area, select the project name at the top, then select the target under TARGETS.
Click the Signing & Capabilities tab and then click + Capability.

From the list of capabilities, find Push Notifications and double-click to add it.
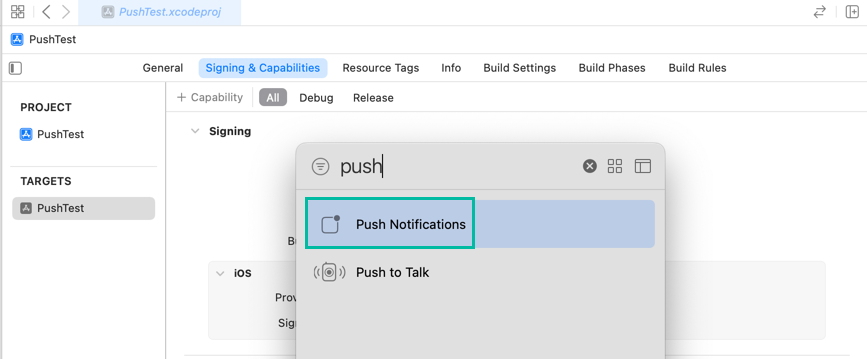
The Push Notifications capability has now been added.

Implement Receiving Push Notifications in the iOS App
To receive Push Notifications, you need to request notification permission, register for notifications, and handle the device token.
Open AppDelegate.swift and add the highlighted code below:
import UIKit
import UserNotifications

@main
class AppDelegate: UIResponder, UIApplicationDelegate, UNUserNotificationCenterDelegate {

    func application(_ application: UIApplication, didFinishLaunchingWithOptions launchOptions: [UIApplication.LaunchOptionsKey: Any]?) -> Bool {

        UNUserNotificationCenter.current().requestAuthorization(options: [.alert, .sound, .badge]) { (granted, error) in
            print("granted: \(granted)")
            print("error: \(error?.localizedDescription ?? "")")
        }
        UIApplication.shared.registerForRemoteNotifications()

        return true
    }

    func application(_ application: UIApplication, configurationForConnecting connectingSceneSession: UISceneSession, options: UIScene.ConnectionOptions) -> UISceneConfiguration {
        return UISceneConfiguration(name: "Default Configuration", sessionRole: connectingSceneSession.role)
    }

    func application(_ application: UIApplication, didDiscardSceneSessions sceneSessions: Set<UISceneSession>) {
    }

    func application(_ application: UIApplication, didRegisterForRemoteNotificationsWithDeviceToken deviceToken: Data) {
        let token = deviceToken.map({String(format: "%02x", $0)}).joined()
        print("deviceToken: \(token)")
    }

    func application(_ application: UIApplication, didFailToRegisterForRemoteNotificationsWithError error: Error) {
        print("Failed to register for remote notifications: \(error.localizedDescription)")
    }
}
Since we are using the UserNotifications framework, add import UserNotifications on line 2.
In application(_:didFinishLaunchingWithOptions:), add lines 9–13.
Lines 9–12 call the requestAuthorization() method of UNUserNotificationCenter with the .alert, .sound, and .badge options to request permission to receive Push Notifications.
On line 13, registerForRemoteNotifications() is called to register with the Apple Push Notification service.
This method runs regardless of whether the user allows notifications, but if the user denies permission, notifications will not appear.
This ensures that if the user initially denies permission but later enables it in the Settings app, the app will still be able to receive notifications.
If registration succeeds, application(_:didRegisterForRemoteNotificationsWithDeviceToken:) is called and the device token is returned.
In lines 25–28, the device token is converted from Data to a string and printed. This device token is required to send Push Notifications.
If registration fails, application(_:didFailToRegisterForRemoteNotificationsWithError:) is called.
In lines 30–32, the received error is printed.
Additionally, to clear the Push Notification badge when the app is opened, add the following code to sceneDidBecomeActive(_:) in SceneDelegate.swift:
func sceneDidBecomeActive(_ scene: UIScene) {
  UIApplication.shared.applicationIconBadgeNumber = 0
}
This completes the basic code needed to receive Push Notifications in an iOS app.
Install the App on iPhone, Allow Notifications, and Obtain a Device Token
Now install the app on your iPhone, allow notifications, and obtain the device token.
When you run the app on an iPhone, you will see a screen asking for permission to send notifications. Tap Allow.

If the registration with APNs is successful, the device token will appear in the Xcode Output console.
You will use this device token when sending Push Notifications.

That's all for how to build an iOS app that receives Push Notifications.