Push Notification(プッシュ通知)を受信する iOS アプリを作る方法
ここでは、Push Notification(プッシュ通知)を受信する iOS アプリを作る方法をご説明します。
Xcode で Push Notifications の Capability を追加する
まず、Push Notification(プッシュ通知)を実装するための Capability をプロジェクトに追加します。
「Push Notification(プッシュ通知)の App ID を生成する方法」で Bundle Identifier を設定したプロジェクトを Xcode で開きます。
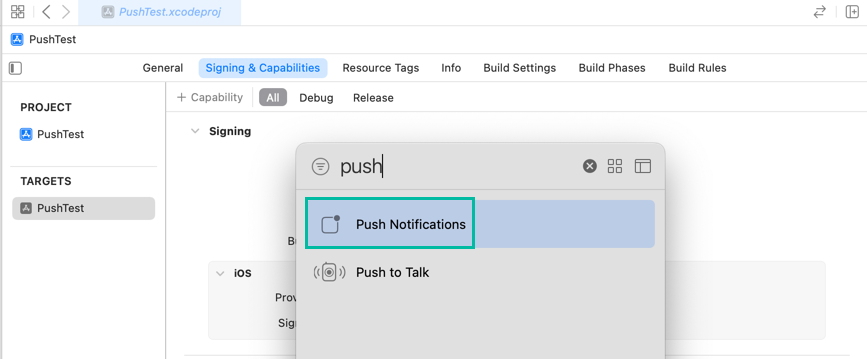
左側のナビゲーターエリアの上のプロジェクト名を選択し、TARGETS のプロジェクト名を選択します。
そして、Signing & Capabilities タブの + Capability をクリックします。

Capability のリストから Push Notifications を探し、ダブルクリックして追加します。
これで、Push Notifications の Capability が追加できました。

iOS アプリで Push Notification を受信する方法
Push Notification(プッシュ通知)を受信するために、通知の許可の承認と通知受信の登録、デバイストークンの確認を行います。
AppDelegate.swift を開き、以下のハイライトされている箇所のコードを追加します。
import UIKit
import UserNotifications

@main
class AppDelegate: UIResponder, UIApplicationDelegate, UNUserNotificationCenterDelegate {

    func application(_ application: UIApplication, didFinishLaunchingWithOptions launchOptions: [UIApplication.LaunchOptionsKey: Any]?) -> Bool {

        UNUserNotificationCenter.current().requestAuthorization(options: [.alert, .sound, .badge]) { (granted, error) in
            print("granted: \(granted)")
            print("error: \(error?.localizedDescription ?? "")")
        }
        UIApplication.shared.registerForRemoteNotifications()

        return true
    }

    func application(_ application: UIApplication, configurationForConnecting connectingSceneSession: UISceneSession, options: UIScene.ConnectionOptions) -> UISceneConfiguration {
        return UISceneConfiguration(name: "Default Configuration", sessionRole: connectingSceneSession.role)
    }

    func application(_ application: UIApplication, didDiscardSceneSessions sceneSessions: Set<UISceneSession>) {
    }

    func application(_ application: UIApplication, didRegisterForRemoteNotificationsWithDeviceToken deviceToken: Data) {
        let token = deviceToken.map({String(format: "%02x", $0)}).joined()
        print("deviceToken: \(token)")
    }

    func application(_ application: UIApplication, didFailToRegisterForRemoteNotificationsWithError error: Error) {
        print("Failed to register for remote notifications: \(error.localizedDescription)")
    }
}
UserNotifications framework を使うので、2 行目に import UserNotifications を追加します。
application(_:didFinishLaunchingWithOptions:) に 9 行目 ~ 13 行目を追加します。
9 ~ 12 行目では、UNUserNotificationCenter の requestAuthorization() メソッドに .alert, .sound, .badge のオプションで、Push Notification(プッシュ通知)を受信する承認を求めています。
13 行目で registerForRemoteNotifications() メソッドを使って、Apple Push Notification service の登録処理を行なっています。
ユーザーが通知を許可するしないにかかわらず registerForRemoteNotifications() は実行されますが、ユーザーが許可しないと通知は表示されません。
こうしておくと、ユーザーが初回の承認のポップアップで許可せずに、設定アプリで通知を許可するように変更した際にも、通知を受信して表示することができます。
registerForRemoteNotifications() は登録成功すると、application(_:didRegisterForRemoteNotificationsWithDeviceToken:) が呼ばれ、デバイストークンが渡ってきます。
25 ~ 28 行目で application(_:didRegisterForRemoteNotificationsWithDeviceToken:) を定義していて、そこでデバイストークンを Data 型から文字列に変換して print しています。
このデバイストークンは Push Notification を送信する際に必要になります。
registerForRemoteNotifications() の登録が失敗した時は、application(_:didFailToRegisterForRemoteNotificationsWithError:) が呼ばれます。
30 ~ 32 行目で application(_:didFailToRegisterForRemoteNotificationsWithError:) を定義していて、そこでは受け取ったエラーを print しています。
あとひとつ、Push Notification(プッシュ通知)のバッジをアプリを開いた時に消すために SceneDelegate.swift の sceneDidBecomeActive(_:) に以下のコードを追加しておきます。
func sceneDidBecomeActive(_ scene: UIScene) {
  UIApplication.shared.applicationIconBadgeNumber = 0
}
iOS アプリで Push Notification(プッシュ通知)を受信するための基本的なコードは以上です。
iOS アプリを iPhone にインストールして通知を許可し、デバイストークンを取得する
作ったアプリを iPhone にインストールして、通知を許可し、デバイストークンを取得します。
iPhone を指定してこのアプリを実行すると、以下のような通知の許可を求める画面が表示されるので、許可します。

Apple Push Notification service の登録処理が成功すると、Output 画面に以下のような感じで出力されるはずです。
このデバイストークンを使って、Push Notification(プッシュ通知)を送ります。

以上、Push Notification(プッシュ通知)を受信する iOS アプリを作る方法をご説明しました。