Node.js を使って Push Notification(プッシュ通知)を送信する方法 - JWT トークン方式
Push Notification(プッシュ通知)を送信するには、Apple Push Notification service (APNs) に HTTP/2 と TLS 1.2 以降で接続して Post リクエストを送ります。
ここでは Node.js で、jsonwebtoken を使ってプッシュ通知を送信するサンプルコードをご紹介します。
まだ、Apple Push Notification service 用の Key の生成や、プッシュ通知を受信する iOS アプリを生成していない方は「Push Notification(プッシュ通知)を実装する方法 (Swift) - JWT トークン方式」をご参考に、済ませておいてください。
Node.js を使って Push Notification(プッシュ通知)を送信する方法 - JWT トークン方式
まず、以下のコマンドで、新規フォルダを作り、ターミナルでそのフォルダに移動し、新規の npm パッケージを生成し、 jsonwebtoken をインストールします。
mkdir apns-test
cd apns-test
npm init -y
npm install jsonwebtoken
そして、同じフォルダ内に send.js というファイルを作り、以下のコードをコピーします。
const fs = require('fs');
const http2 = require('http2');
const jwt = require('jsonwebtoken');

const authKeyPath = './AuthKey_XXXXXXXXXX.p8'; // File path to .p8
const keyId = 'XXXXXXXXXX';                    // Key ID
const teamId = 'XXXXXXXXXX';                   // Team ID
const bundleId = 'com.softmoco.PushTest';      // App Bundle ID
const deviceToken = 'xxxxxxxxxxxxxxxxxxxxxxxxxxxxxxxxxxxxxxxxxxxxxxxxxxxxxxxxxxxxxxx';

const privateKey = fs.readFileSync(authKeyPath);

const jwtToken = jwt.sign(
  { iss: teamId, iat: Math.floor(Date.now() / 1000) },
  privateKey,
  {
    algorithm: 'ES256',
    header: { alg: 'ES256', kid: keyId }
  }
);

const client = http2.connect('https://api.sandbox.push.apple.com');

const request = client.request({
  ':method': 'POST',
  ':path': `/3/device/${deviceToken}`,
  'authorization': `bearer ${jwtToken}`,
  'apns-topic': bundleId,
  'content-type': 'application/json'
});

request.setEncoding('utf8');

let response = '';
request.on('data', chunk => { response += chunk; });
request.on('end', () => {
  console.log('Response:', response);
  client.close();
});

const payload = {
  aps: {
    alert: {
      title: 'Hello',
      body: 'Softmoco Push Notification Test 123!!'
    },
    sound: 'default',
    badge: 1
  }
};

request.write(JSON.stringify(payload));
request.end();
5 行目の authKeyPath には、「Apple Push Notification service 用の Key を生成する方法」で生成してダウンロードした p8 ファイルへのファイルの path を設定します。
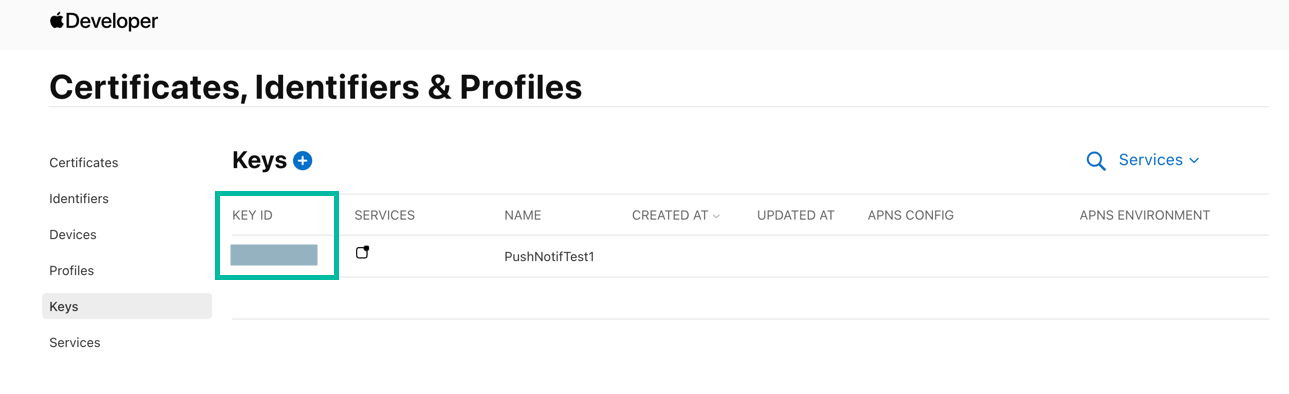
6 行目の Key ID は Apple Developer アカウントの Keys の画面で確認できます。
7 行目の Team ID は Apple Developer アカウントの複数箇所に表示されていますが、Membership details で確認可能です。


8 行目の App Bundle ID は、App ID と Push Notification(プッシュ通知)を受信する iOS アプリに指定したものを同じものを設定してください。
9 行目の deviceToken には「Push Notification(プッシュ通知)を受信する iOS アプリを作る」で取得したものを使います。
11 行目では .p8 秘密鍵をファイルから読み込んでいます。
13 ~ 20 行目で、JWT を署名付きで生成しています。
22 ~ 39 行目では、HTTP/2 接続を開いてヘッダーとエンコーディングを設定し、レスポンスを受信した際にログを出力して処理を終了するようにしています。
41 ~ 50 行目で、通知の内容を指定する payload を生成しています。
ここで、タイトル、本文、サウンド、バッジなどを指定できます。
52 ~ 53 行目でペイロードを送信して終了しています。
ターミナルを開きこのファイルを実行します。
node send.js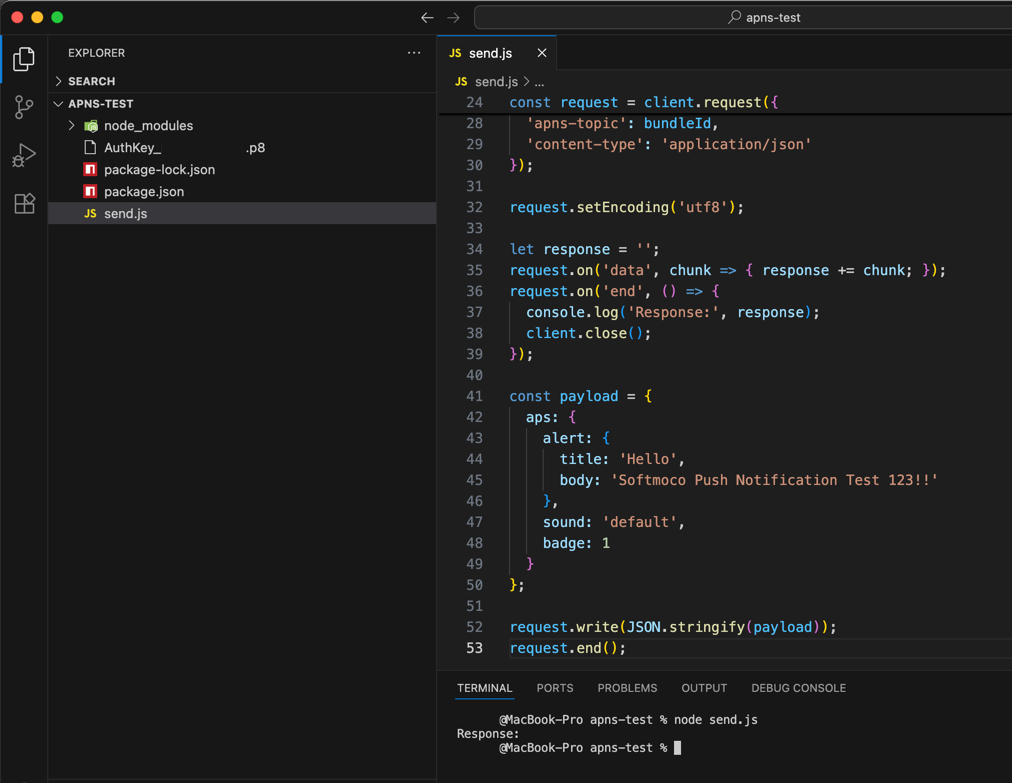
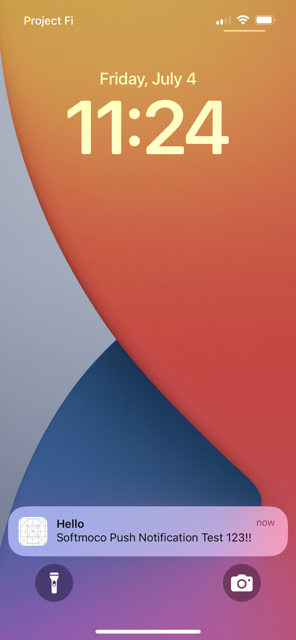
Push Notification(プッシュ通知)をこちらで作成した PushTest (com.softmoco.PushTest) の iOS アプリで受信できました。
以上、Node.js を使って Push Notification(プッシュ通知)を送信する方法をご説明しました。